Chicken and Leek Pie

Leave a comment

Pies are such a pain in the neck to make, even when you’re cheating. First it’s the pastry base, then the filling, then the pastry top…but if your kids are old enough (like mine have just become) to understand that they shouldn’t touch the hot, hot ramekin bowl that their pie is served in – well, it makes life a lot easier. There goes those pesky bases, right out the window! Suddenly, pies can become one of the quickest, easiest and of course, yummiest home baked meals.

Chicken and Leek Pie

The Mixture

What you need:

*1 store purchased BBQ chicken. Use the fillets, chopped (yes, of course you can cook up a couple of chicken fillets yourself – but this is the cheat’s version, ok?).

*8 rashers of bacon, trimmed of fat and rind and then chopped.

*1 commercial brand jar of Bechamel sauce (normally used for lasagne)

*Half cup of cream or milk

*1 clove of garlic

*2 cups of sliced leeks

*3 spring onions, chopped

*3 – 4 sheets of commercial frozen puff pastry

*A handful of grated tasty cheese.

*Salt and pepper to taste

*Egg wash – mix an egg with a splash of milk

*5 – 6 small ceramic ramekins, depending on how many people you need to feed!

Chicken and Leek Pie_2

Ready for the oven.

How it’s done:

Into a hot pan, add chopped garlic and leeks. Allow the leeks to soften, then add your bacon. Once that begins to brown, add chicken, Bechamel sauce and milk (or cream). Allow to simmer and reduce until mixture is thick. Finally, add spring onions (we like ours to stay a little crunchy) and seasonings. Turn your pan off, and allow it to cool slightly, before stirring through grated cheese.

While your mix is cooling, pre-heat oven to 180 degrees C. Thaw out your puff pastry sheets, and cut to size big enough to cover the top of each ramekin. I use a small saucer as a guide. Place a ladle-sized scoop of the chicken and leek mixture into each ramekin, filling it to about ¾ full – allow for some bubbling while it’s cooking. Then, splash some egg wash around the perimeter of the ramekin with a pastry brush, and pop the pastry lid on, pinching it firmly around the edges. Prick the tops with a knife or fork to allow steam to escape, and give the whole thing another go with the egg wash.

Bake for around 15 minutes, or until the pastry tops are golden brown. Serve with chips and vegetables. And don’t forget to remind the rest of your family that the ramekins are hot!

Chicken and Leek Pie_3

Chicken and Leek Pie

Bubblegum Flavoured Panna Cotta and Jelly Eyeballs – *Halloween Special*

Leave a comment

Throwing a Halloween party and looking for something special to tempt your guests with? Or what about simply freaking out the kids who dare to come Trick or Treating? Well, have I got something for you…

Okay, so here’s the admission – it took me three goes to get these right. That’s good news for you because I’ve already made the mistakes, and the resulting recipe is dead easy.

eyeballs _2

Voila! Enough to ewwww! the most seasoned Halloween goer!

What you need:

500 ml of cream

250 ml of milk

½ cup caster sugar

Bubblegum flavouring

Gelatine Powder

Various food colours

Ice cube trays with rounded bottoms

Spray oil

Wooden skewer

Flat bottomed, plastic container

Small, round cutter – I used the end of a piping nozzle.

Fine paintbrush

eyeballs_3

Jelly and moulds

How it’s done:

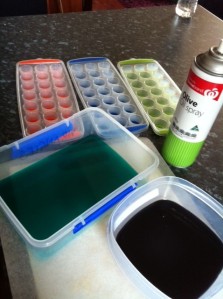
Mix about a cup of boiling water with a tablespoon of gelatine, stirring well to get all the lumps out. Add a couple of drops of your desired iris colour – I found pale blue to be the most (ahem) authentic. Pour into the flat bottomed plastic container and refrigerate. This mix shouldn’t be more than 3mm thick.

While the iris mix is setting, pour the cream and milk into a small saucepan and, while stirring, bring to the boil. Turn down the heat and add caster sugar, stirring until it dissolves. Remove from heat and add the bubblegum flavouring (I used ‘Robert’s Confectionary’ brand, and found I needed about 2 capfuls to get enough flavour). Refrigerate.

eyeballs_4

Cute Eyeballs

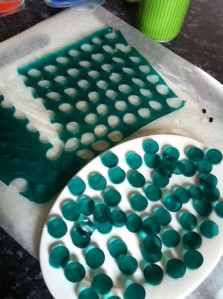
Your iris mix will be set by now, so remove it from the fridge and run the wooden skewer around the outside of your jelly mix. It will lift easily out of the plastic container and feel quite rubbery. Place it on a sheet of greaseproof paper, and with the round cutter, stamp out as many ‘irises’ as you need. Lightly grease the ice-cube trays with spray oil, and place one iris piece at the bottom of each rounded cube.

Your bubblegum cream mixture will be chilled by now (very important not to use it hot – it will melt your irises), so remove it from the fridge. Add about half a cup of the mixture back into the saucepan, along with 3 tablespoons of gelatine. Stir over a low heat until the gelatine is dissolved. Now, workingvery quickly (it will set fast) add the warm mixture back into the chilled cream mix. Stir or whisk to combine. Making sure the entire mixture is cool or at least room temperature, add a teaspoon or so to each ice-cube mould, pouring directly over your jelly iris. Refrigerate again.

eyeballs

Eyeballing!

Once set, gently remove your eyeballs from the ice cube trays, again using the skewer. Place flat on the tray or plate that you plan to serve them on. Add a couple of drops of black food colouring to a small glass, and with a fine paintbrush, dab a little in the middle of each iris, to form the pupil. Store covered in cling wrap in the fridge.

I found the eyeballs looked most authentic the next day, after some of the colour had leached into the cream mix, and the black food colour had soaked in. If you’re feeling particularly creative, you could always serve these with a drizzle of red food dye, or even mashed up raspberries on the side.

Eyeballs_1

Dah dah!

Peppermint Crisp Pavlova

Leave a comment

Pavlova is one of those recipes that some people are known for – we all have a Great Aunt Gertrude whose pav is a thing of family myth and legend – and others are terrified of. Truth is, pavlovas are a really, really easy to make as long as you don’t rush things. There’s no great secret to getting a perfectly crispy shell and a soft, marshmallowy centre – just patience and a few simple rules.

Peppermint Crisp pav_5

Fresh Eggs

I made this one for my Beloved’s birthday earlier in the week:

What You Need:

160ml of eggwhites (Best from room temperature eggs)

1 ¼ cup of caster (aka superfine) sugar

2 teaspoons of white vinegar

2 ½ tablespoons of sifted cornflour

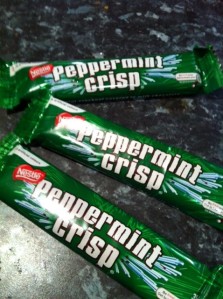
For Decoration: 250ml cream, a teaspoon of vanilla essence, a tablespoon of icing mixture and 3 Peppermint Crisp chocolate bars.

Peppermint Crisp pav_4

Egg whites whipped

How it’s Done:

Pre heat oven to 130 degrees C.

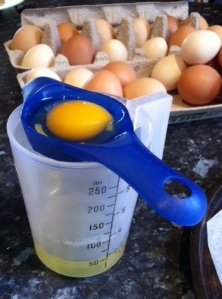
160ml of eggwhite is what you’ll get from about 5 standard sized eggs. But as you can see from the photo – eggs at my place don’t exactly come in standard sizes! We keep our own backyard chickens in a couple of different breeds. So I find it’s much easier to measure the eggwhite instead of assuming 4 or 5 eggs will do it. Also, if you’re like me and useless at separating the whites from the yolk, check out this groovy little gadget that does the job for you. Easy!

Okay, so into a large mixing bowl, add your 160ml of eggwhite and, using an electric beater, mix on medium speed until the whites turn…well…white, with soft, foamy peaks. This will take about 4 or 5 minutes. Slowly add the caster sugar, a little at a time. Keep beating on medium to high in between sugar additions. Before adding the next lot of sugar, make sure the grains from the previous addition are completely dissolved.

(Hint: An easy way to do this is to rub a little between your forefinger and thumb. If it’s gritty, keep whisking.)

As you whisk, you’ll find the mixture growing and changing texture to a firm, glossy meringue. I find I’m usually whisking for at least 20 minutes.

(Hint: When you think it’s finally ready, take a spoonful and turn the spoon upside down – if it stays put and doesn’t drip, it’s done.)

Add the vinegar and cornflour and mix gently until combined.

Peppermint Crisp pav_3

The pav!

On a round baking tray lined with baking paper, begin to pile up the mixture. Again, don’t rush this bit, make sure there’s no air left underneath, the sides are fairly straight and bear in mind that the meringue will spread a little as it bakes, so it’s better to pile it high. Add to the pre-heated oven, and turn the temperature down to 120 degrees C. Bake for 1 hour, 30 minutes. Turn the oven off, and open the door a little. This allows the pavlova to cool down slowly and there’s less chance of it crashing!
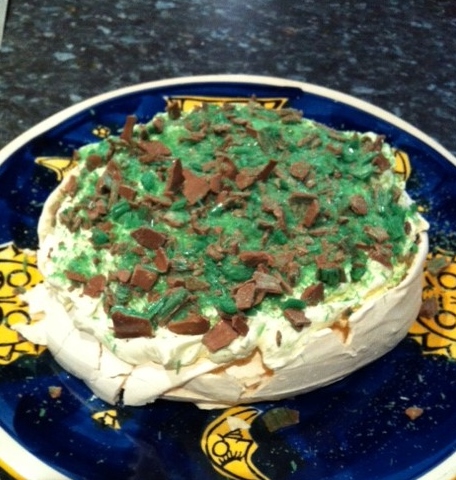
While the pav cools completely, head back to the electric beaters and whip up the cream. I find adding icing mixture helps to stabilise it a bit, and gives a thicker result (that one’s a hint from my Mum). Add vanilla, too. Crush the Peppermint Crisps by whacking them on the edge of the bench-top while they’re still in their packets. No mess!

Peppermint Crisp pav

Decorated with peppermint crisp

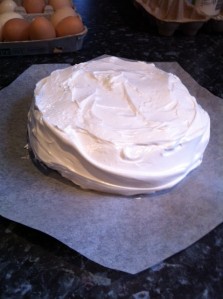
Once your pav is cool, very, very carefully transfer it with a spatula to your serving plate. Break up the meringue on top, pile on the cream and sprinkle loads of the crushed up Peppermint Crisp, and you’re ready to go.

See? No great mystery there – but that’s not to say you have to admit there isn’t! Shhh…

Peppermint Crisp pav_2

The topping!

From Mandy’s Garden – Garlic Braids

Leave a comment

photo-3 (10)

Home Grown Garlic

Last weekend I pulled our crop of garlic. I’d grown the odd bulb before, but never in any sort of numbers. Garlic has got to be the easiest thing to grow, ever. Just break up a shop-purchased bulb and pop each piece into the ground, pointy end up. And then forget about them. That’s it. Seriously. And pests don’t find it all that tasty, so it acts as a repellent for your other plants too. So over this recent winter, I dropped heads of garlic in wherever I had a few spare centimetres of space, which meant about 60 bulbs that needed something done with them all at once. But what to do? Well, as an ex-hairdresser the answer was obvious. Braid them, of course!

photo 1 (8)

Garlic braids 1

I let the garlic dry outside for the week undercover and protected on a table. Then, (and trust me, this next bit is best done outside too) I trimmed the roots from each bulb with scissors and gave them a gentle dust off with a pastry brush. You want to remove as much dirt as possible without damaging the fine, crunchy outer layers of your bulb. A heap of dry debris, dirt and muck ended up in my compost bin instead of the kitchen floor. Next, I sorted the bulbs into two piles – large and small and took them inside. Armed with a pair of scissors, some kitchen twine and muscles, it was time to begin.

photo 2 (6)

Garlic braids 2

First, gather 3 biggish bulbs and tie together with the dried ‘stalks’ pointing towards you. Using a simple plait technique (right over the middle, left over the middle, right over the middle, left over the middle…you get the drift), add in a new garlic to each middle strand. To fill gaps, I sometimes used two smaller bulbs. Keep the plait as tight as possible, which means working slowly and using those muscles. As your braid grows, it gets tougher to work with and some of the stalks aren’t as pliable as others – but they can be coaxed!

photo (46)

Vampire Strips!

When I finally ran out of garlic bulbs, I tied the end tightly with more twine, and added a loop at the back to hang in the kitchen. Looks pretty, huh? Apparently, if we keep it away from the steam of the coffee machine, it’ll last for months. Yeah, it stinks a bit. But I guess we don’t have to worry about vampires for a while…

Chocolate Chip Cookies

Leave a comment

This recipe gets a huge work-out in our family. I’ve been making these cookies for years, and they disappear almost as quickly as they bake. Chewy in the middle, crunchy on the outside and just the right blend of vanilla and chocolate. And so, so yummy while they’re still warm!

CC cookies_dough

Cookie dough!

1 cup of softened butter (use the real stuff, not margarine)

1 cup white sugar

¾ cup brown sugar, tightly packed

2 teaspoons of vanilla essence

1 teaspoon of salt

2 eggs

3 cups of plain flour

1 ½ teaspoons of baking soda

250 grams of milk or dark chocolate chips

CC cookies_final

Cookies and Milk!

Preheat oven to about 140 degrees C.

In a large bowl, beat together the butter, sugars and vanilla essence until it lightens in colour and gets a kind of creamy texture. An electric mixer makes this bit easy. Add eggs, one at a time and continue mixing.

In another bowl, mix together the flour and baking soda. Gradually add this to your butter and sugar mixture. Be careful at this point, especially if using a stand mixer – if you’re not careful, flour goes everywhere! (I do it every single time…)

Keep mixing until well combined, then add the chocolate chips. Mix until they’re evenly spread through the mixture.

On a baking tray lined with baking paper (hey, we all hate cleaning up, right?) spoon balls around 1 tablespoon of mixture. Don’t place them too close together, because these suckers spread. I usually put seven to a large tray. Now comes the tricky bit – you need to cook them for LESS time than you’ll think. It only takes about 10 minutes for the cookies to change colour to a light golden brown, which is your signal to pull them out. They’ll still be super-soft, so let them cool for a minute or two, then use a spatula to transfer them carefully to a cooling tray.

This recipe makes about 45 to 50 cookies – I dare you to eat just one!

Sushi – the whole story

Leave a comment

We eat loads of Japanese food at our place. It’s healthy, clean and doesn’t make you feel like you need a nine hour nap when you’re done feasting. But best of all, one meal can cater for everyone’s tastes – especially when we do these sushi rolls.


sushi 1

Ingredients

*Sushi rice. Don’t try and swap it for another type of rice – it just doesn’t work. You can find all these Japanese ingredients in the Asian section of your local supermarket.

*Nori – aka flat sheets of seaweed.

*Sushi vinegar.

*Japanese mayonnaise – optional.

*Wasabi – green Japanese horseradish. Optional, and packs a punch so use it sparingly.

*Japanese ginger to serve – optional.

*Japanese soy sauce to serve.

*Fillings – now this is where you get to customise your sushi rolls. At our place, favourite ingredients include: carrot, cucumber, capsicum, tofu, salmon (raw from the fish shop – make sure you ask for sushi grade) as well as smoked salmon, caviar, egg, avocado and prawns. You could also use crab meat, lettuce, shredded chicken or tuna.


sushi 2

It’s all in how you roll!

Rice: First up, you need to cook your rice. Add equal amounts of water and rice to the pot – eg: if you use two cups of rice, add two cups of water (this is the amount used to make the sushi rolls pictured). Bring rice to the boil for about 3 minutes, then reduce heat to medium. Once the water is just about absorbed, turn to low for a further 5 minutes, then turn off the heat and let rice stand 15 minutes with the lid on. Stir through 2 tablespoons of rice vinegar. We usually cook our rice a couple of hours before it’s needed and refrigerate until needed.


Filling: Slice all ingredients into strips. Carrot, cucumber, capsicum, tofu (my favourite!), avocado etc. With the egg, make a plain egg omelette and then slice into fine strips. Prawns and other seafood can also be sliced. The key here is to be organised, with everything ready for rolling on the bench.


sushi 4

And slice!

Roll ‘em up! This can be tricky the first time, but it gets easier with practice. Lay your sheet of nori on a sushi mat (also available in the Asian food section at the supermarket). Spread your cooled rice evenly over the top, leaving gaps at the top and bottom. Then, add your fillings, including mayonnaise or wasabi. It’s much easier to roll if you don’t add too much, especially for beginners.

Once you’re loaded up, start at the end closest to your body, use the mat to guide your nori, and roll up and away from yourself. Be firm, take it slowly and remember to tuck the end closest to you. Once your sushi roll is rolled, it should resemble a long cylinder.

Pop it aside, and start on the next one. Repeat. Refrigerate for 10 or 15 minutes to make the rolls easier to slice, using a VERY sharp knife. Again, take it slowly and try to slice your rolls evenly. We usually discard the end pieces.


Serve with soy, mayonnaise, ginger and more wasabi (if you’re game!)

sushi 6

And present it!


*With thanks to Simon, my very special hand model!


Nanna’s Best Nibbles

Leave a comment

My Nanna used to make these moorish nibbly (aka Nuts & Bolts) things up for us, and for as long as I can remember there was always a bowl of them sitting on the kitchen bench. Nan’s gone now, but we’ve all carried on making Nibbles in her memory. I’ve altered her recipe slightly by spicing things up a little, and using less oil. She fried them in a deep-sided electric frypan, while I prefer to bake them for health reasons.


Nanna's Nibbles

Nanna Knows Best!

Large packet of Kellogg’s Nutri-Grain breakfast cereal

2 packets of French Onion dry soup mix

¾ cup of vegetable oil

1 packet of unsalted peanuts

1 packet of beer-nuts

1tsp curry powder

1tsp paprika

½ tsp chilli powder

**optional – mixed nuts and other spices of your choice, such as onion or garlic powder.


How it’s done:

In the largest mixing bowl you have, add the Nutri-Grain and nuts. Shake the soup mixes over the top, and mix through. In a separate jug, add the oil, curry powder, paprika. Stir to combine and then pour over Nutri-Grain/nut mix. Now, you need to get your hands a bit icky and work the oil mixture through, so that everything is coated as evenly as possible.

Line a couple of baking trays with baking paper, and spread the mixture thinly. Bake in a very slow oven (about 120 C) for an hour, turning every 15 minutes or so with an egg lift.

Cool, and store in an airtight container.

Wild Things Hedgehog

Leave a comment

There are four Wild Things living at my house. And that’s not counting my dogs. My Wild Things are all two-legged males, and all have bottomless pits for stomachs. They each eat around five meals a day and that’s not including snacks. Or dessert. Yes, they could easily be mistaken for Hobbits, except they’re bigger and their feet aren’t quite as hairy. So what keeps my Wild Things happy and satisfied? Hedgehog. It’s cheap, quick, chocolatey (and therefore yummy) and very, very easy.

Hedgehog

Hedgehog for Wild Things

125 grams of butter

½ cup caster sugar

1 packet of Marie biscuits

100 grams of walnuts, chopped

½ cup cocoa

1 egg, beaten with a fork.

How It’s Done:

Crush biscuits in a blender, leaving some chunky bits. Transfer to a large mixing bowl. Combine butter and sugar in a microwave-safe bowl. Heat in microwave until butter is melted and sugar is dissolved. You might need to pause the microwave and stir the mix a couple of times. Pour butter mixture over biscuits, cocoa and about half the walnut pieces. Mix, cool for five minutes and then add the beaten egg and mix.

Press into a greased slice tin and refrigerate for an hour.

For the icing, add 2 tablespoons of butter and 200 grams of dark chocolate to a heavy-based saucepan. Melt over low heat, and then add 2 cups of sifted icing sugar. If the icing gets too thick, add a dash of hot water. Smooth over hedgehog and sprinkle with remaining walnuts. Refrigerate and then slice into pieces. Store in the fridge.

**Note: the hedgehog slice in this photo was made with double the recipe amounts shown here, as well as two different brands of cocoa, which is what gives it the striped appearance.

Kale Chips

Leave a comment

Okay, so we all know Kale has been named the new uber-food. It has just about everything good vitamin and mineral known to man crammed into those weird-looking curly leaves. But, let’s face it, it’s kind of bitter just boiled up on the side of your plate. And just how many green smoothies can you drink? Kale chips are huge at my place. Everyone – and I mean everyone – loves them. And they couldn’t be easier to make.

Kale

Kale

*A bunch or good handful of kale leaves. I grew my own this year (yes! That’s my real veggie patch in the pic!) and I’ve just been trimming leaves off as I need them. But it is also readily available in the local supermarket or green grocer’s.

*A tablespoon of olive oil.

*Sea salt.

*Lemon.

*A tablespoon of white vinegar (optional)

*Pepper or other spices, eg: garlic powder, chilli, paprika (optional)

Kale Chips

Kale Chips

Wash and pat dry your kale leaves. Using scissors, cut any thick white stem out, just leaving the greenery. Trim to bite-size. In a large bowl, toss the kale with the olive oil and salt to taste. This is where I like to add the vinegar and some cracked pepper. Salt and vinegar chips, anyone?

On a lined baking tray, place the kale pieces flat, without overlapping each other. Cook in a low oven (120 degrees C) for 10 minutes. Be really careful, because they WILL burn quickly. You’ll be amazed at how crispy a vegetable can be in such a short time. Serve with a drizzle of lemon juice and more pepper, if desired.

Malteser Cake

2 Comments

The Malteser Cake is perfect if you’re after a treat that will knock everyone’s socks off. Not only does it look super-impressive, but it’s delish!

It does come with a warning though – it’s not for the faint-hearted. This one is seriously sweet and chocolately; even for seasoned chocolate addicts, any more than a sliver might just have you jumping sky-scrapers.

What you’ll need:

150g of softened butter

250g of caster (superfine) sugar

150g of self-raising flour

125g of sour cream

4 eggs

50g of cocoa powder

1tsp of baking powder

a pinch of salt

a few drops of vanilla essence or extract

How it’s done:

Pre-heat your oven to 160 degrees C.  Grease and line 2 x 20cm round cake tins with baking paper. I actually doubled this recipe and made four. Because, you know – more impressive. This recipe works best if you have an electric mixer of some sort, or really big muscles. I used a mixer.

Mix together the butter, caster sugar, flour and sour cream. Then add the eggs (one at a time), cocoa powder, baking powder and salt. Finally, add the vanilla.

Divide the mixture evenly between your cake tins, smooth the tops with a spatula and cook for about 30 mins, or until a skewer stuck into the middle comes out clean. Let them cool for a couple of minutes before turning out (carefully!) onto a wire tray to cool completely.

Marble cake 2

Malteser Cake

Buttercream Icing:

100g of dark chocolate, melted (you can either do this in the microwave in a bowl over simmering water. I find the microwave method a bit hit and miss – it’s easy to burn or ‘seize’ the chocolate)

550g of icing sugar

250g softened butter

2 tbs of milk

Mix together your icing sugar, butter and milk until they’re light and fluffy. Then add the chocolate and mix again.

Now for the fun bit!

Smother each layer of cake with buttercream (again, I doubled this recipe) and squish gently together. Then cover the whole thing with even more chocolately buttercream, paying extra attention the edges of the cake. Once it’s totally covered, you’ll need about 600 to 700 grams of Maltesers. Start at the bottom of the cake, in the middle and place the Maltezers over the cake in a straight vertical line. Use that as a guide to covering the entire cake.

Ta-Daaa!